Moneysoft Fact Find Integration Process – Iress XPlan CRM, Client Records and Fact Find Data
Summary
When integrated, Moneysoft and XPlan deliver a powerful combination. The following guide runs through the set-up process and then syncing of Single and Partner Fact Find data, in easy-to-follow steps.
Steps to make the XPlan integration available:
- You must have an operational Moneysoft Professional or Partner account with active clients
- Login to your Partner account and navigate to the admin account page
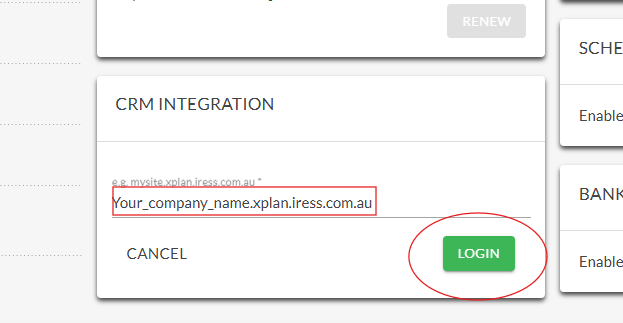
- On the CRM Integration tile, enter your XPlan site URL (forward host) into the respective field. Do not include https://. Then click ‘Login’
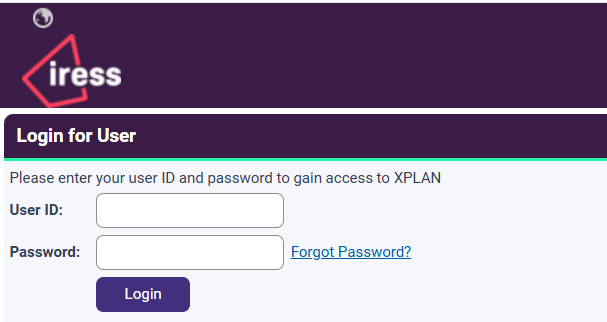
4. Enter your User ID and Password in the respective Iress user login fields then click ‘Login’
5.You will receive the following message. Click ‘Allow’

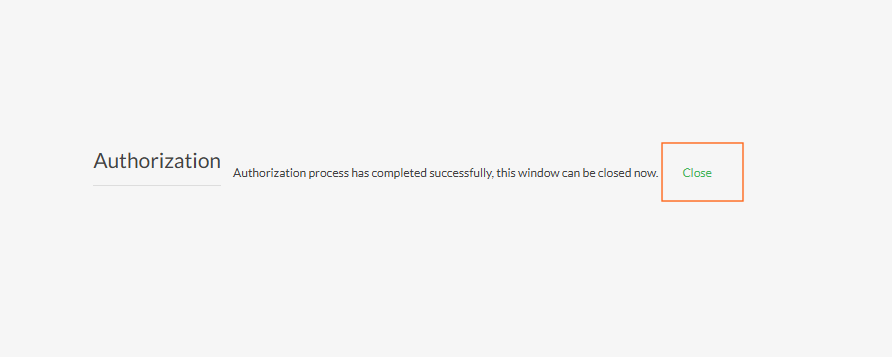
6. An authorisation will appear to confirm that XPlan is connected. Click ‘Close’
Transferring Moneysoft Fact Find Single Person information to XPlan
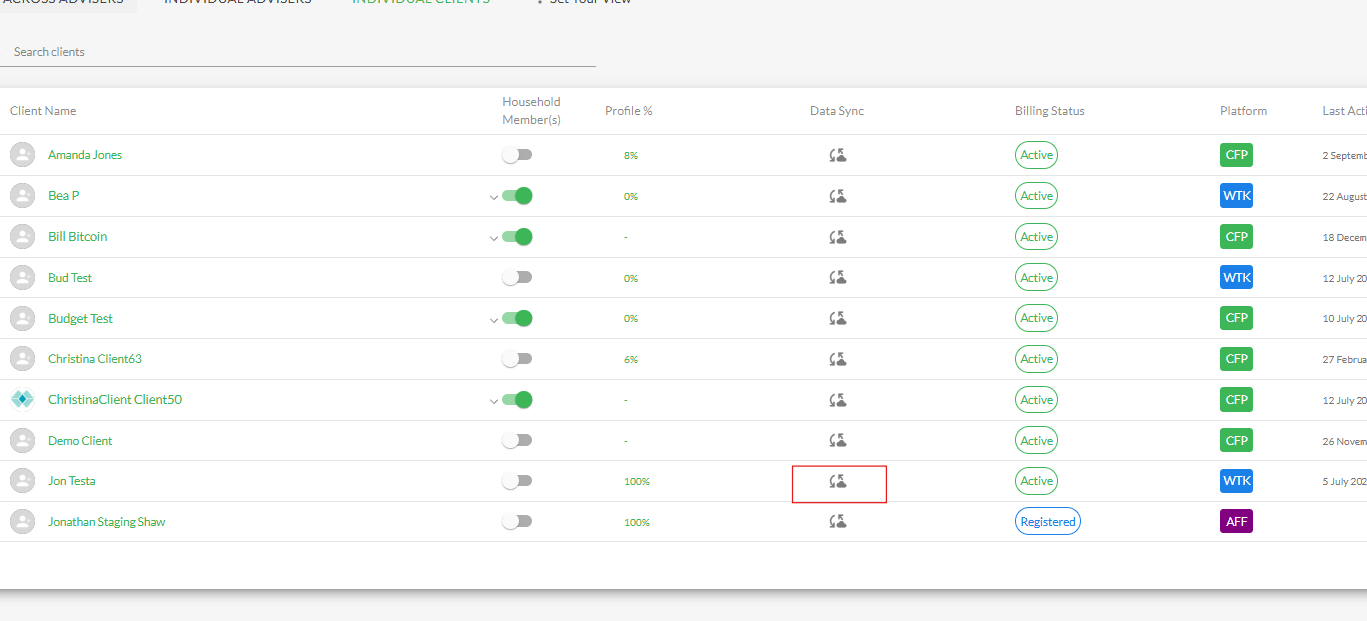
1.Return to your Moneysoft partner account client list page (click ‘Dashboard’) and select the client for which to integrate Fact Find data. Click the appropriate icon in the ‘Data Sync’ column next to the selected client name.
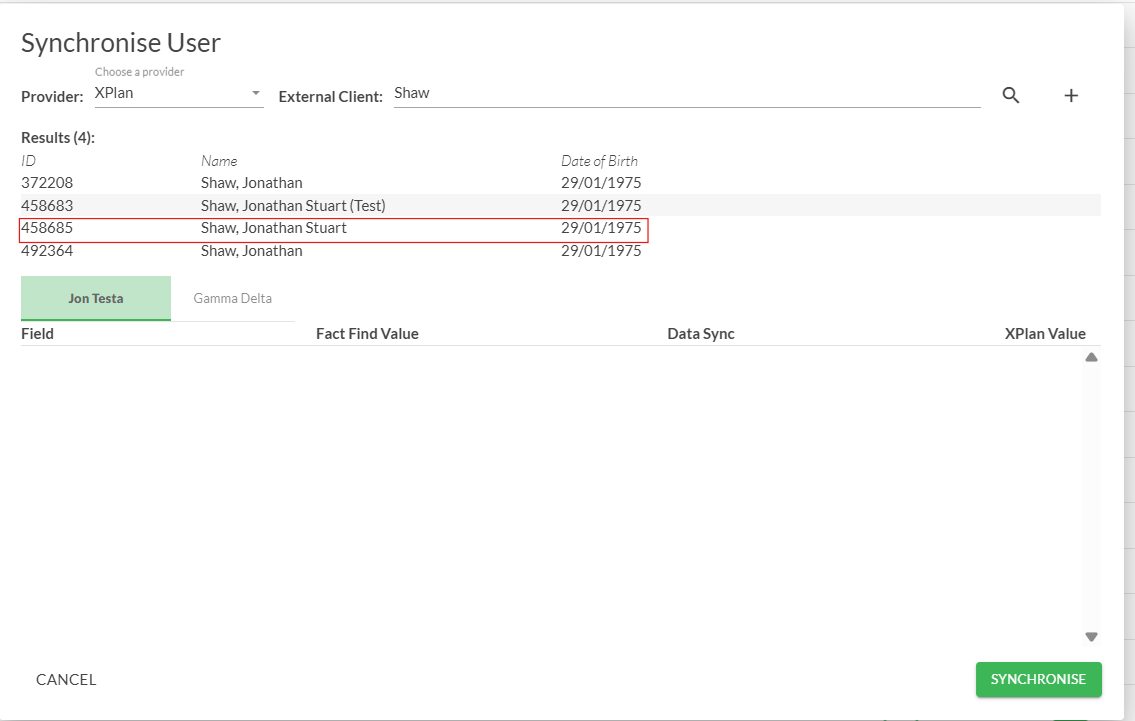
2.The provider to select is ‘XPlan’. Search for the client’s name in the ‘External Client’ field, then select the actual client to prepare the mapping. An example is as shown in the next screenshot below.
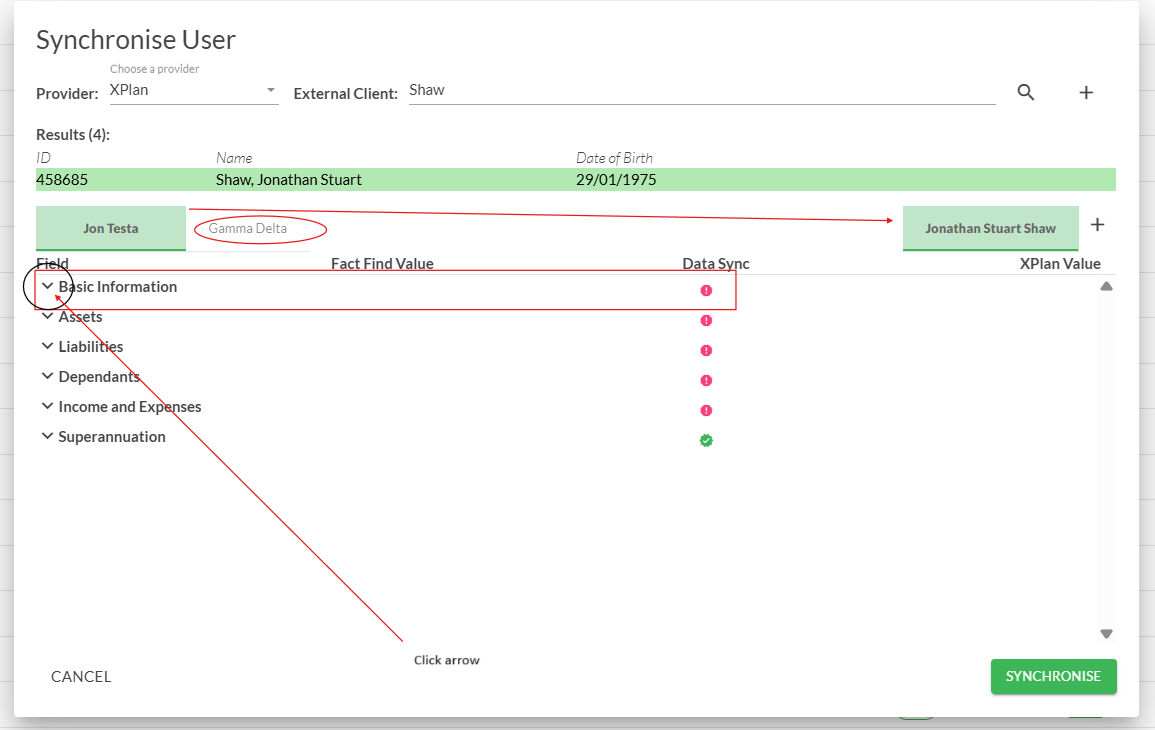
3.Selecting ‘Jonathon Stuart Shaw’ as the X-Plan profile we wish to transfer data to, produces the following screen type. In this example, we will elect to synchronise ‘Basic Information’, which is shown as ‘not in sync’ along with four other information module sets (as indicated by the red dot). The user will click on the drop-down arrow (as is circled).
Notice that Jon Testa has Moneysoft Fact Find partner information (Gamma Delta) associated. Although in this case, we are only transferring Jon’s data set over to his XPlan profile, as highlighted with the name tab shown on the right side of the screen. How to transfer single and partner information together is explained further below in a different example
4.Clicking on the arrows under the ‘Data Sync’ column, will indicate whether the information can be exported to XPlan from Moneysoft or is available in XPlan to import. You can see the current XPlan value that is currently held, or whether there is a blank field, under the ‘XPlan Value’ column.
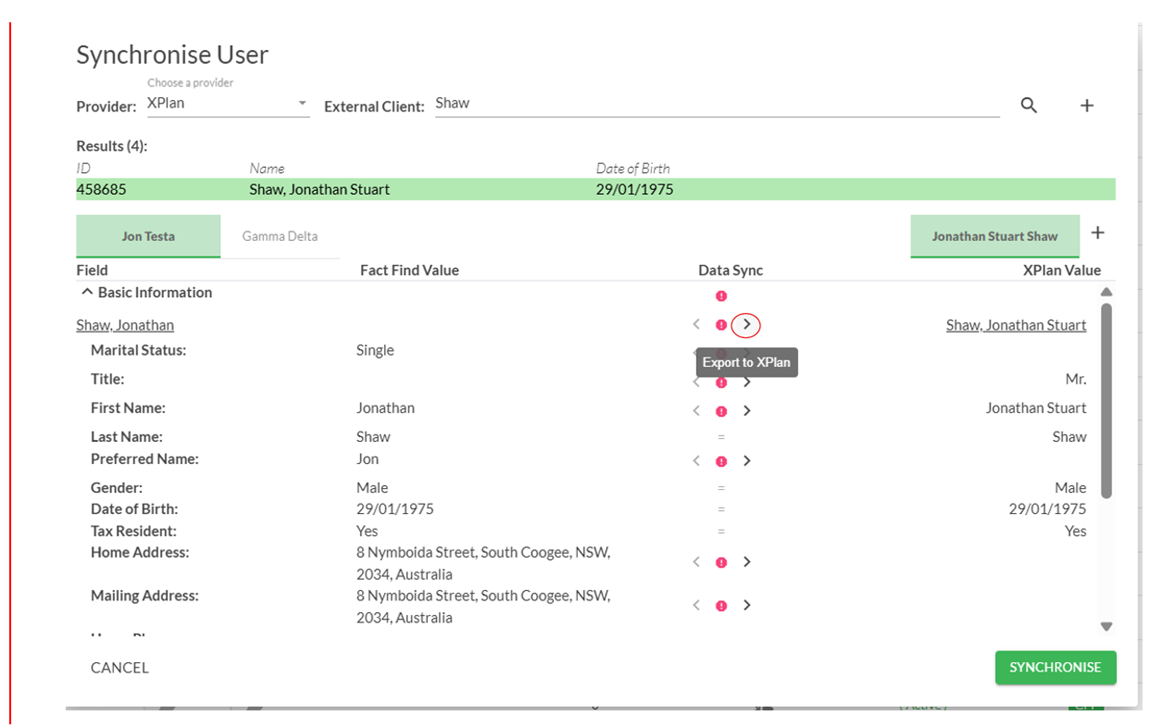
Click on the arrow (‘Export to XPlan’), which will automatically highlight all pieces of information that will be exported. Then click ‘Synchronise’
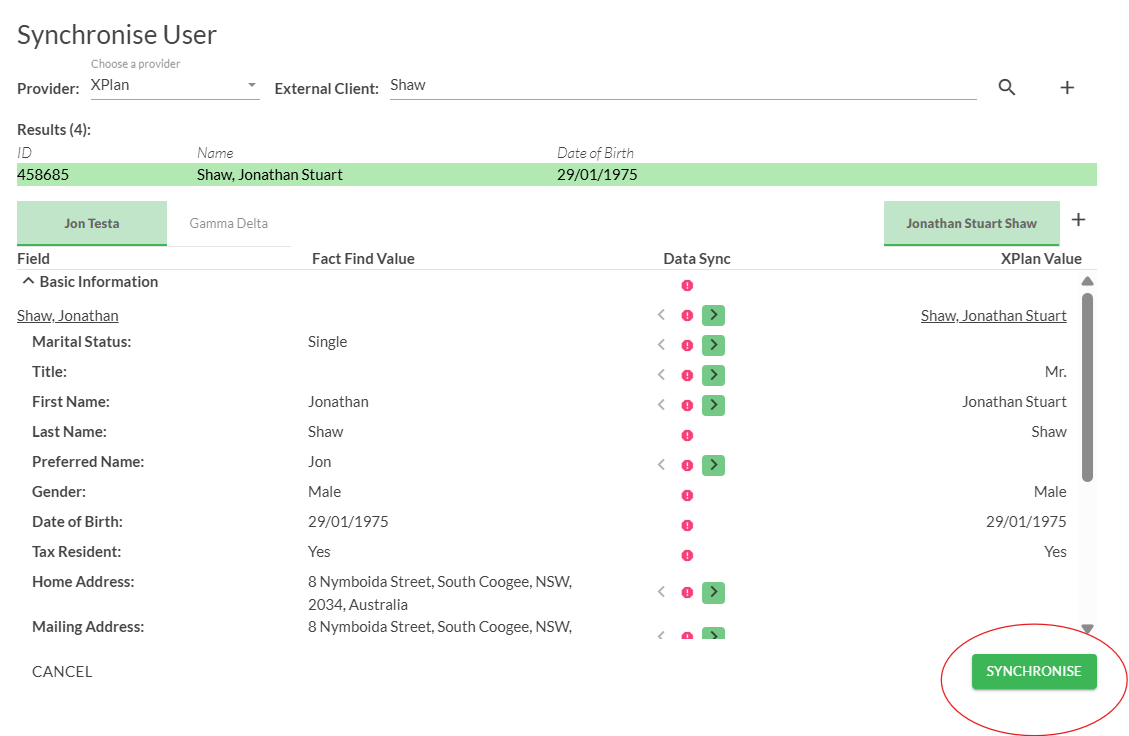
5.After clicking ‘Synchronise’ there will be a short wait as the data transfers.
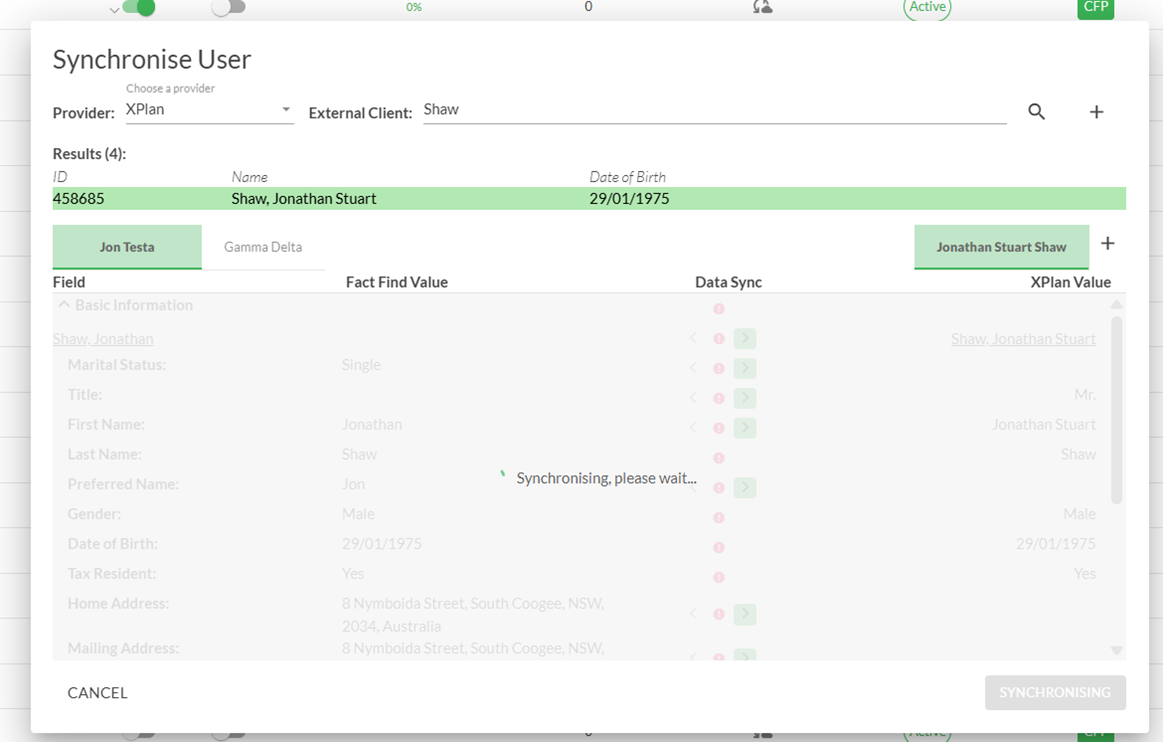
6.See below that in this example all information has matched. Once all data in the information set is synced with XPlan, a green dot will display in the ‘Data Sync’ column.
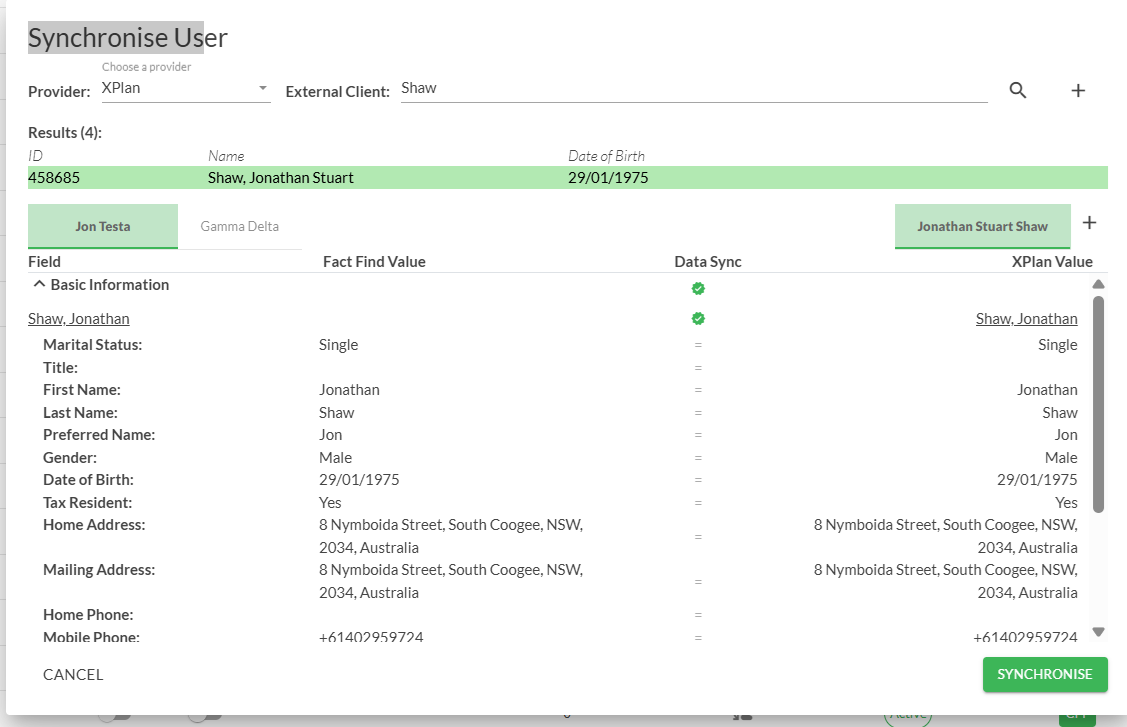
7.Do the same for all information sets, to update values and fields in XPlan. Whenever information has not synced, the unmatched data must be corrected in either Moneysoft or in XPlan, so that it matches. Once this is done, try again to find that the transfer of data has been successful
Transferring Moneysoft Partner Fact Find information to XPlan
1.Ensure that XPlan is made available for integration via the administration account page
2. In this example, we know that partner information was included separately in the Fact Find modules for John Smith. If the partner information has not been included in the Moneysoft Fact Find, go back into ‘Profile View’, to add a partner information set, for all appropriate modules

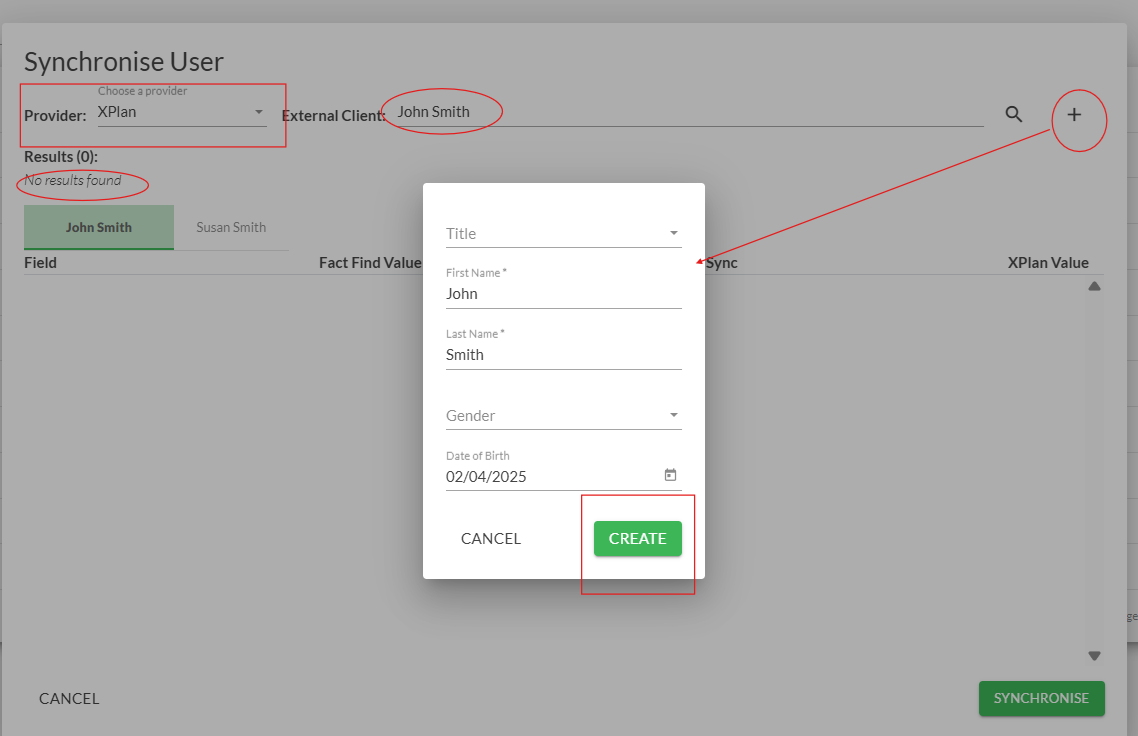
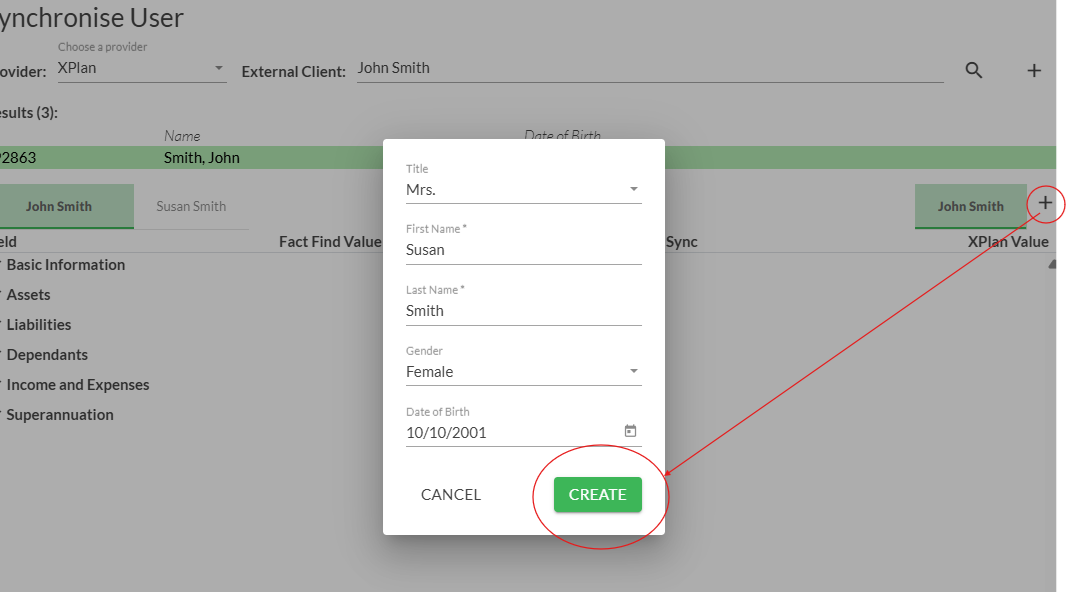
3.As demonstrated in the following screen, we select provider as ‘XPlan’, search for John Smith (and Susan Smith). As there were no results found for the search of both names, that proves that there was no X-Plan record for them. To create a record in XPlan, click on the ‘+’ button at the right-hand top of the screen. Complete as necessary (insert details and correct date of birth) and then click ‘Create’
4.Search for John Smith again and you will find an XPlan record is now available (created). Click on the record to bring up the data to be synced. Notice that a ‘+’ button is available on the ‘X-Plan values’ right side next to John Smith. Click this to create the XPlan record for partner Susan Smith.
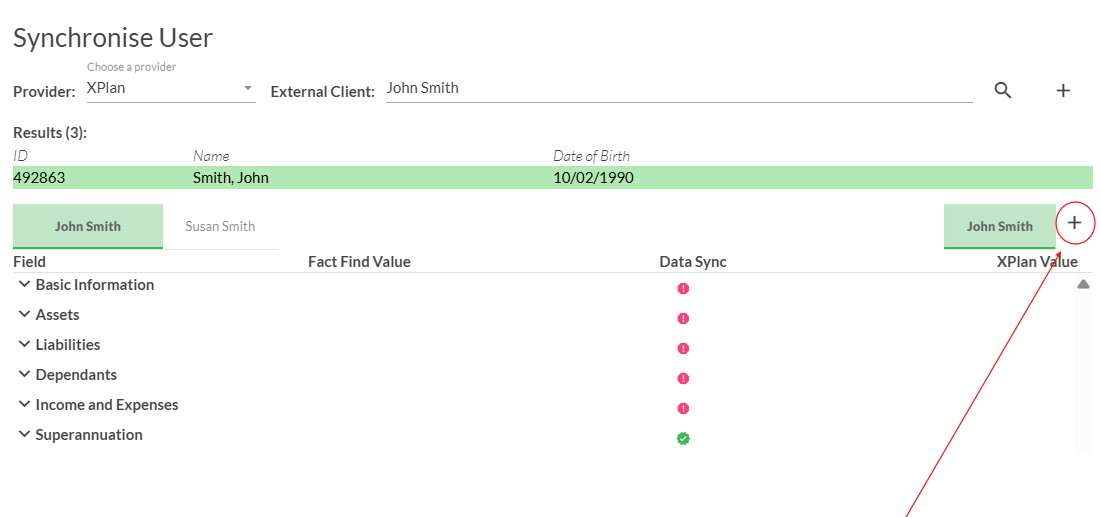
Click to create XPlan record for Susan Smith
5.Once the record is created in XPlan for Susan Smith, you will see the name appear on the right-hand side and become selectable for mapping.
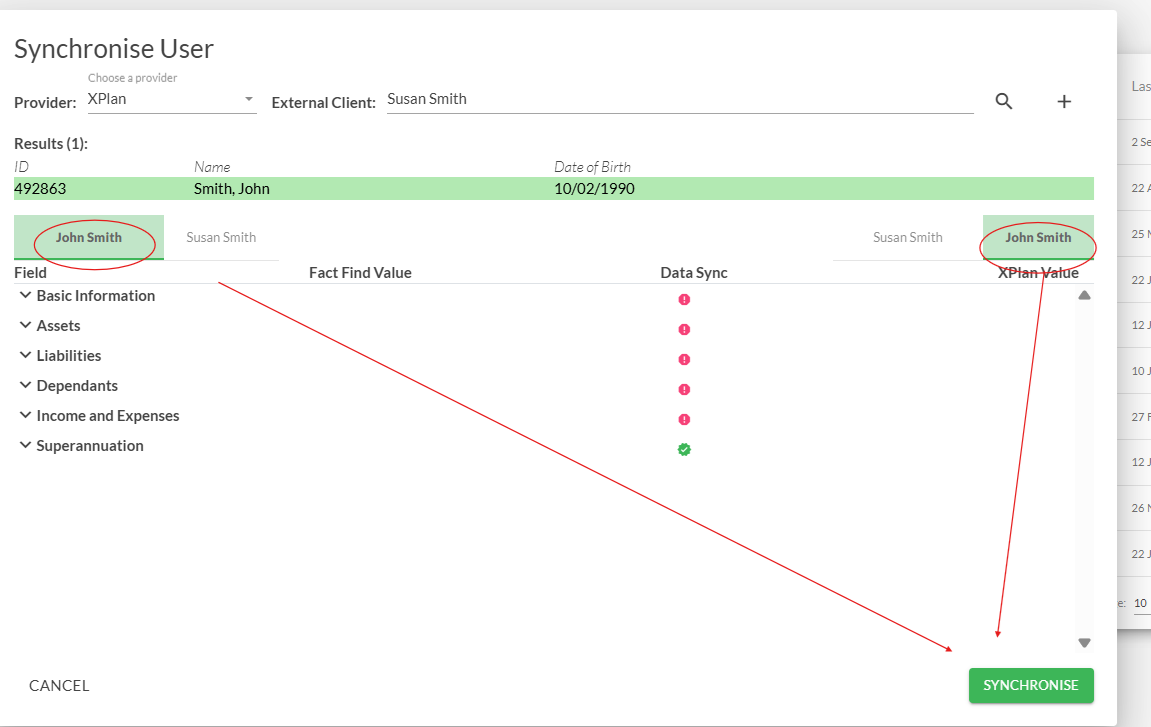
6.We will transfer data from John Smith in Moneysoft Fact Find to John Smith in XPlan first. Make sure the identical names are highlighted on each side of the screen, to ensure the data is transferred correctly. Then click ‘Synchronise’
7. We then transfer each module set one by one, starting with ‘Basic Information’, just in the same way as transferring single person information as described above.
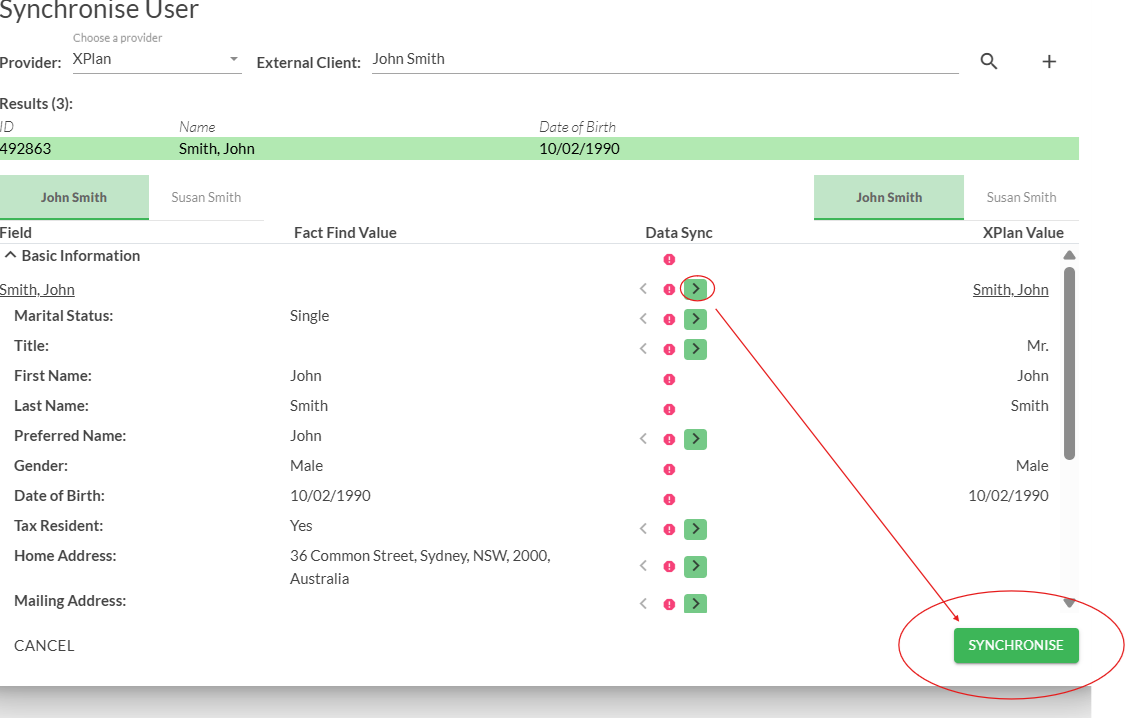
8.The process for each data set will take a few seconds. A green tick will appear to indicate that the transfer has occurred successfully.
As shown in the below screen shot, for assets and liabilities, you are prompted to create a new XPlan record for John Smith for that data set, as you go 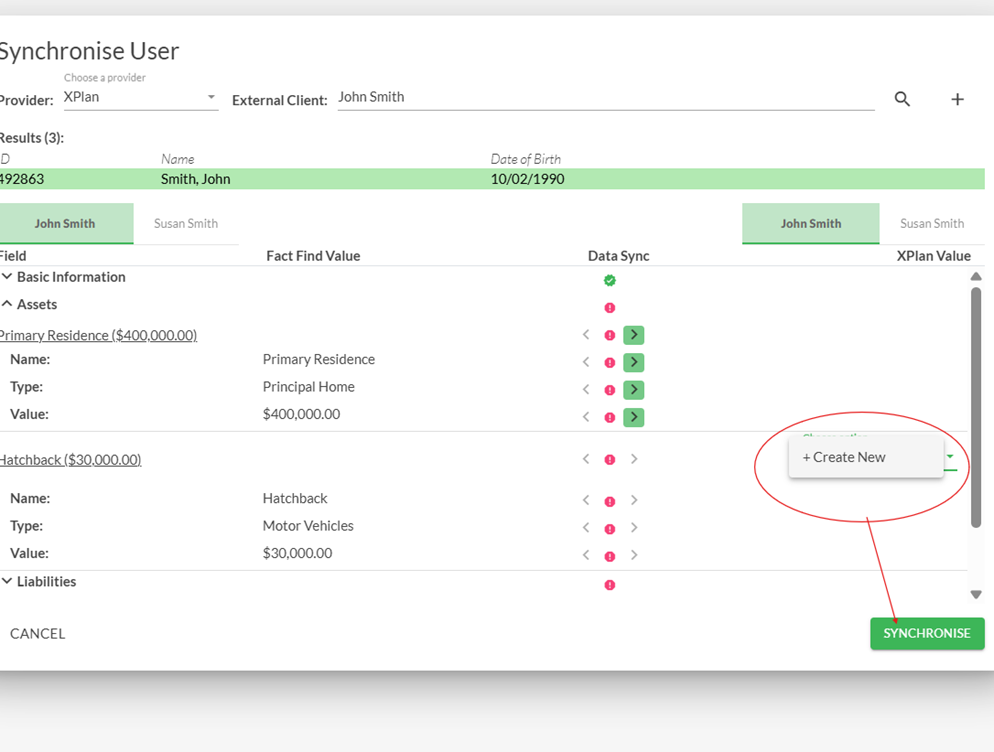
9.Repeat until all data sets are done, then follow the same process to merge data from Moneysoft to XPlan, for Susan Smith
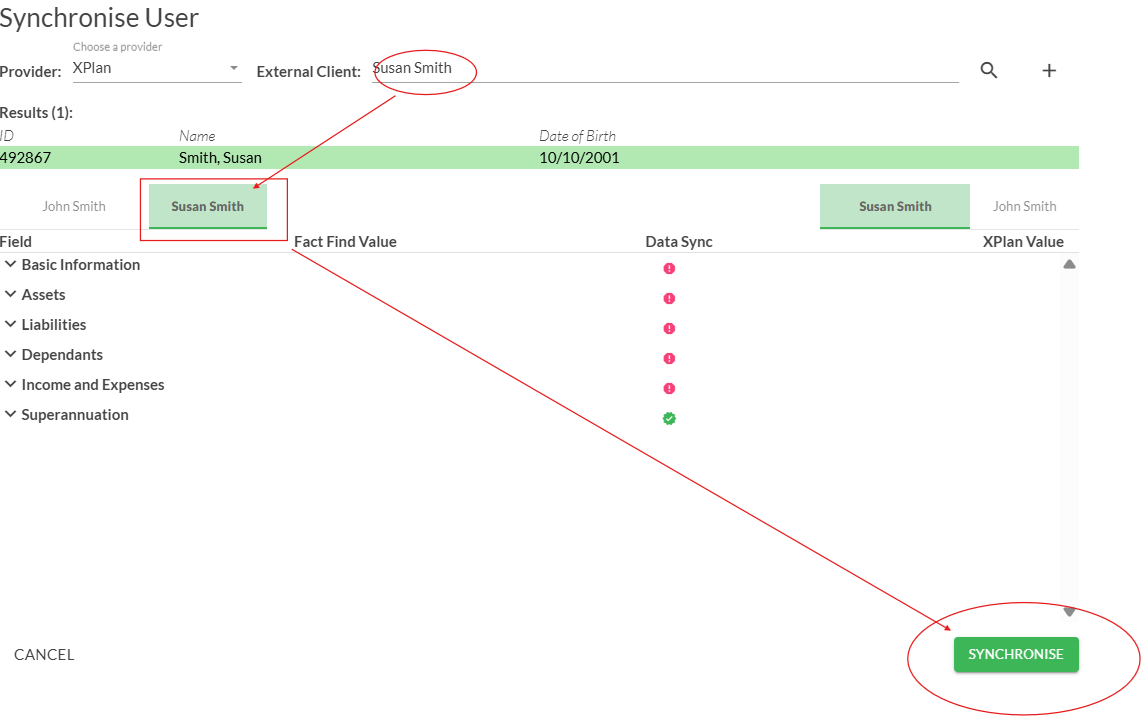 10. Do ‘Basic information’ first, then ‘Assets and Liabilities’, and so forth
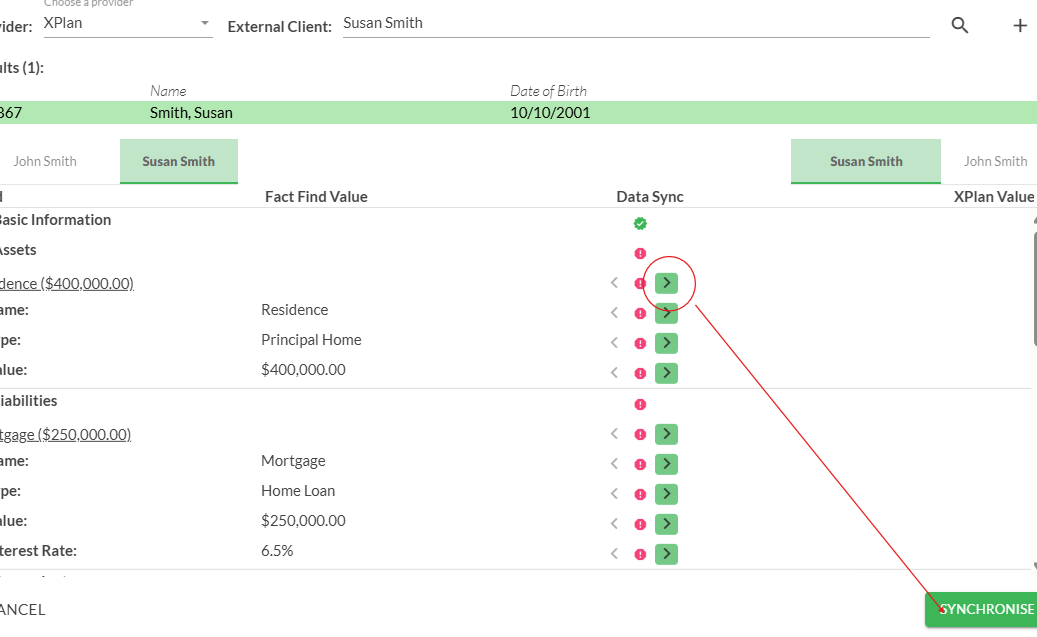
11. You should check that the data is correctly matching. If not, you would have to amend the required detail in the Moneysoft profile module accordingly. When you return to the integration screen you will find the syncing for the information set has succeeded (green ticks in the data sync column)


